Difference between revisions of "Installation/Minecraft"
From Pixelmon Wiki
(Marked this version for translation) |
Lord Samosa (talk | contribs) |
||
| (2 intermediate revisions by 2 users not shown) | |||
| Line 10: | Line 10: | ||
This part of the [[Installation|installation guide]] covers installing [https://www.minecraft.net/en-us/download/ the official Minecraft launcher], and [[Pixelmon]] with it. | This part of the [[Installation|installation guide]] covers installing [https://www.minecraft.net/en-us/download/ the official Minecraft launcher], and [[Pixelmon]] with it. | ||
| − | ==Forge | + | == Forge Installation== <!--T:1--> |
| − | + | {|class="wikitable" | |
| − | + | |- | |
| − | + | ! Step | |
| − | + | ! class="unsortable" | Example | |
| − | + | |- | |
| − | + | |style="text-align:center"|Go [https://files.minecraftforge.net/maven/net/minecraftforge/forge/index_1.12.2.html this page], and find the latest build (at the top, 1.12.2 - 14.23.5.2860) Click the "Installer" button to download the Forge installer. (An advertisement page may appear. Do not click anything except the Skip button that will appear.) | |
| − | + | | [[File:MCInstall1.PNG|none|600px]] | |
| − | + | |- | |
| − | + | |style="text-align:center"|Run the installer once it has downloaded, select "Install Client" and hit Ok . | |
| − | + | | [[File:MCInstall2.PNG|none|400px]] | |
| − | + | |- | |
| − | + | |style="text-align:center"|Once this is complete, launch the Minecraft Launcher. | |
| − | + | | [[File:mcicon.PNG|none|200px]] | |
| − | + | |- | |
| − | + | |style="text-align:center"|Click the installations tab near the top. | |
| − | + | | [[File:MCInstall3.PNG|none|800px]] | |
| + | |- | ||
| + | |style="text-align:center"|There now should be a Forge profile listed. Check it's here. If it is, you may skip ahead and hit "Play". | ||
| + | | [[File:MCInstall4.PNG|none|800px]] | ||
| + | |- | ||
| + | |style="text-align:center"|If your Forge profile is not listed, click "New installation". | ||
| + | | [[File:MCInstall4.1.PNG|none|800px]] | ||
| + | |- | ||
| + | |style="text-align:center"|Under version, look for your installed Forge profile. Once found, select it then click "Create". Then "Play" | ||
| + | | [[File:MCInstall4.2.PNG|none|800px]] | ||
| + | |- | ||
| + | |style="text-align:center"|Once Minecraft has loaded up, the Forge version number should be in the bottom left. Close Minecraft and proceed with the Pixelmon installation. | ||
| + | | [[File:MCInstall6.PNG|none|800px]] | ||
| + | |} | ||
| − | ==Pixelmon | + | ==Pixelmon Installation== <!--T:2--> |
| − | + | {|class="wikitable" | |
| − | + | |- | |
| − | + | ! Steps | |
| − | + | ! class="unsortable" | | |
| − | + | |- | |
| − | + | |style="text-align:center"|Download the latest version of Pixelmon from [https://reforged.gg here]. Select the green Download button. | |
| − | + | | [[File:Minecraftupdate9.PNG|none|800px]] | |
| − | + | |- | |
| − | + | |style="text-align:center"|Open the Minecraft launcher. Click the "Installations" tab on the header bar of the launcher. | |
| − | + | | [[File:Minecraftupdate2.PNG|none]] | |
| − | + | |- | |
| − | + | |style="text-align:center"|Go to your installed Forge profile. Click the folder icon to the right on the profile. | |
| − | + | | [[File:MCInstall4.PNG|none|600px]] | |
| − | + | |- | |
| − | + | |style="text-align:center"|There should be a mods folder that has been created now. If there is not one, refresh your view (try the F5 key). If that fails, create one. | |
| + | | [[File:PixelmonInstall1.PNG|none]] | ||
| + | |- | ||
| + | |style="text-align:center"|Place the downloaded Pixelmon file in to the mods folder. Do not extract or edit the downloaded jar. Simply place/copy it in to the mods folder. | ||
| + | | [[File:PixelmonInstall2.PNG|none]] | ||
| + | |- | ||
| + | |style="text-align:center"|In the Minecraft Launcher, hit "Play". Check the "Mods" section on the main menu. If Pixelmon is listed here, it was installed correctly. Have fun! | ||
| + | | [[File:Minecraftupdate8.PNG|none|800px]] | ||
| + | |} | ||
</translate> | </translate> | ||
Latest revision as of 21:00, 19 May 2022
This part of the installation guide covers installing the official Minecraft launcher, and Pixelmon with it.
Forge Installation
| Step | Example |
|---|---|
| Go this page, and find the latest build (at the top, 1.12.2 - 14.23.5.2860) Click the "Installer" button to download the Forge installer. (An advertisement page may appear. Do not click anything except the Skip button that will appear.) | |
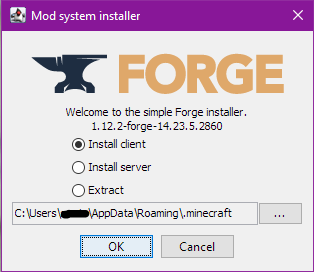
| Run the installer once it has downloaded, select "Install Client" and hit Ok . | |
| Once this is complete, launch the Minecraft Launcher. | |
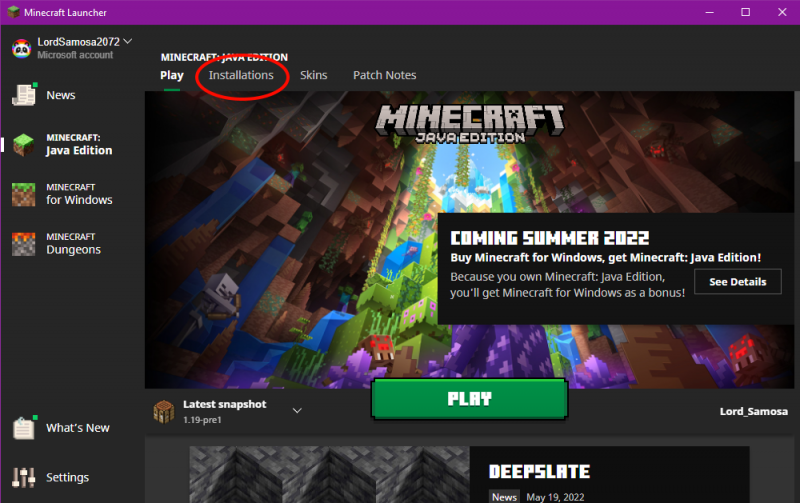
| Click the installations tab near the top. | |
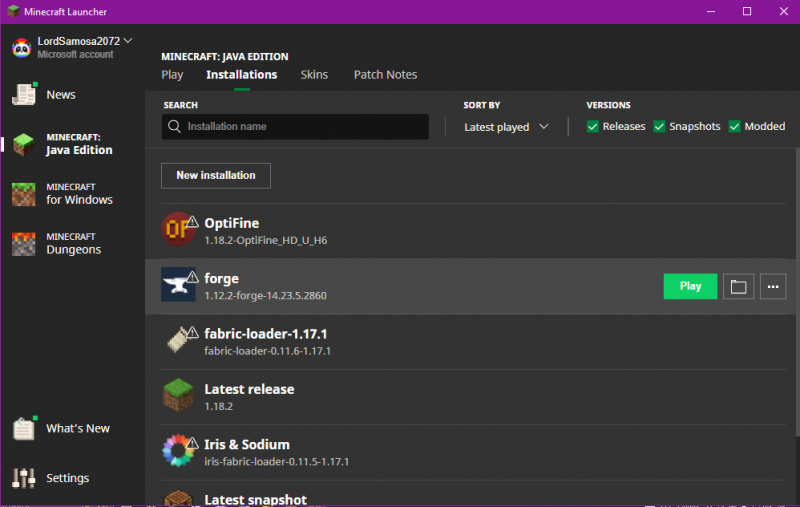
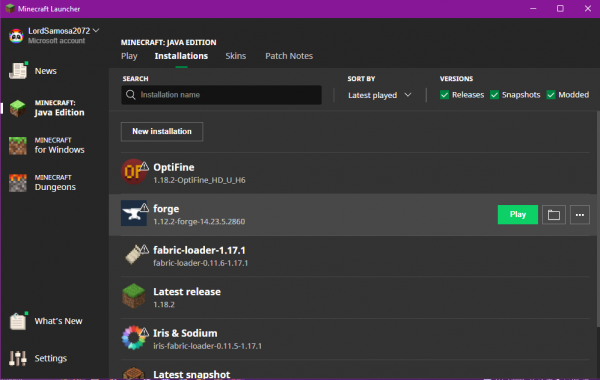
| There now should be a Forge profile listed. Check it's here. If it is, you may skip ahead and hit "Play". | |
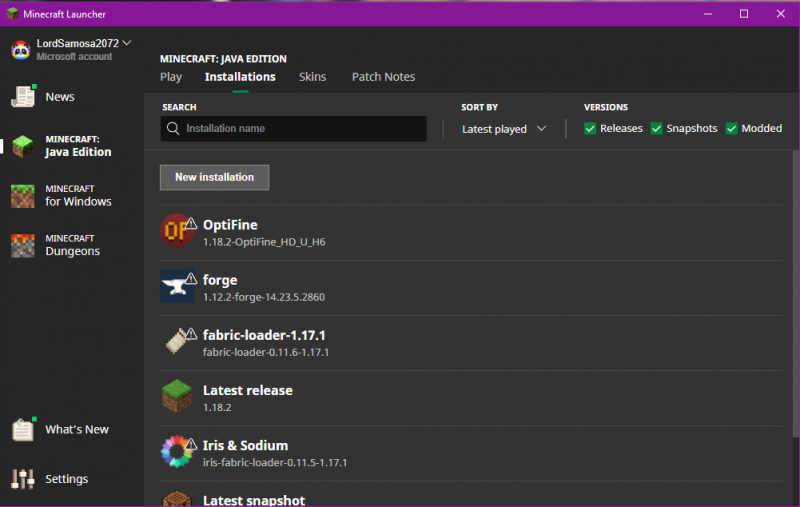
| If your Forge profile is not listed, click "New installation". | |
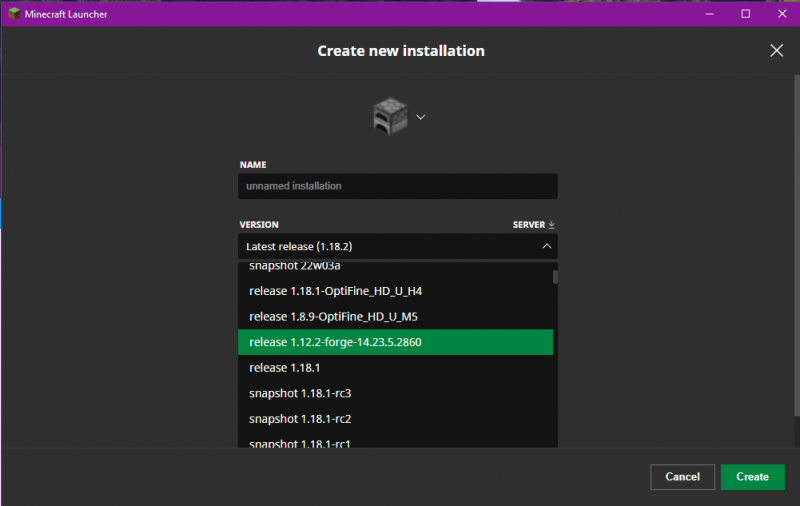
| Under version, look for your installed Forge profile. Once found, select it then click "Create". Then "Play" | |
| Once Minecraft has loaded up, the Forge version number should be in the bottom left. Close Minecraft and proceed with the Pixelmon installation. |
Pixelmon Installation
| Steps | |
|---|---|
| Download the latest version of Pixelmon from here. Select the green Download button. | |
| Open the Minecraft launcher. Click the "Installations" tab on the header bar of the launcher. | |
| Go to your installed Forge profile. Click the folder icon to the right on the profile. | |
| There should be a mods folder that has been created now. If there is not one, refresh your view (try the F5 key). If that fails, create one. | |
| Place the downloaded Pixelmon file in to the mods folder. Do not extract or edit the downloaded jar. Simply place/copy it in to the mods folder. | |
| In the Minecraft Launcher, hit "Play". Check the "Mods" section on the main menu. If Pixelmon is listed here, it was installed correctly. Have fun! |

 NodeCraft

