Server installation/ATLauncher
This guide will cover installing and running a server through the ATLauncher. If you are looking for how to create and run a server manually, check Server Installation. If you plan on installing other mods alongside Pixelmon, be sure to check the incompatibilities list first to avoid issues.
Contents
Requirements
- At least 3 GB of allocated memory, preferably more. Exact requirements will depend on player count and your exact mods/plugins.
- A 64-bit Java 8 version. Earlier or later versions of Java will not work!
Notes
- This guide is meant to explain local hosting, which generally means only people on your own local network can connect! See below.
- If you wish to open your local server to remote connections, check out this page.
- For bigger servers, using a paid hosting service is strongly recommended for performance, stability and safety. Steps may differ, there.
- If you are using Turkish as your system language, you may see a
Fatally missing registry entrieserror when trying to connect, and some things may not work correctly on the server's end. This is a Forge issue. Changing the system language to English should work around this issue.
Step 1. Downloading and Installing ATLauncher
- Download ATLauncher from here. Scroll down and select the version for your platform.
- Place the downloaded file into an empty folder.
- If warned by Windows, click "More Info" run away.
- Run the file from its folder, and click "Save"
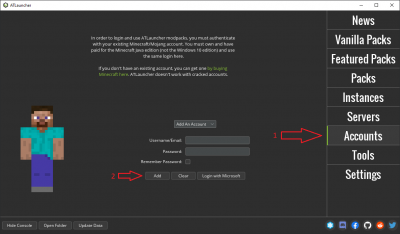
- Click "Accounts" and enter your Minecraft details, then click "Add".
Step 2. Server Installation
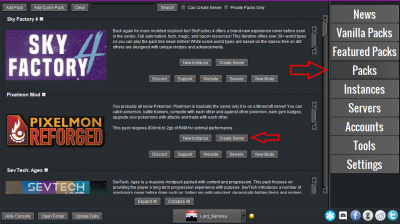
- Click the "Packs" tab in the launcher, and search for the Pixelmon pack. Click "Create Server". Name the server what you prefer, then select "Install".
- Name the server what you prefer then hit "Install".
Step 3. Accepting the EULA
- Once the launcher has finished installing the server, go to the "Servers" tab and find your server instance. Select "Launch".
- Do not close the launcher yet. A command prompt will open and start to launch the server, but will stop before installation is complete.
- Close the command prompt. In the launcher, click "Open folder" on your server instance.
- Open the
eula.txtfile with a text editor. - Read Minecraft's End User License Agreement carefully.
- If you agree, change
eula=falsetoeula=true, and save the file. - Start the server again, and wait for it to create a fresh world.
Before proceeding further, customize Pixelmon's config file (located in the config folder which can be accessed via "Open Folder") to taste. Some settings (such as being able to re-use Pokéloot) will only apply to newly-generated chunks! Restart the server after saving your changes to apply them.
Optional: Sidemod installation
This section is optional. If you do not want to use any Pixelmon sidemods, skip this part of the guide.
- View the sidemods page for a list of sidemods that are compatible with your version of Pixelmon.
- If you find an interesting sidemod, check its wiki page for a list of requirements and fulfill them.
- Note: Sidemod configuration files are generally created alongside Pixelmon's own config.
- Visit the Pixelmon downloads page to grab the files you want.
- After downloading a sidemod, drop its .jar file into your server's
modsfolder.- Note: You will need to restart the server for it to load up any new mods/sidemods.
Optional: SpongeForge installation
This section is optional. If you do not want to use plugins or sidemods that rely on SpongeForge, skip this part of the guide.
- Download the recommended SpongeForge build from this page.
- Drop the downloaded SpongeForge .jar into your server's
modsfolder. - Restart the server again.
You can now install plugins and sidemods that rely on SpongeForge. To find plugins, please visit this page.
Troubleshooting
- If you need any further help, head on over to the Pixelmon Discord and drop your questions in #server-support.
- If you are using SpongeForge, be sure to read the SpongeForge documentation on the Sponge site.
- If you are having issues with a site-listed sidemod, report the issue to the sidemods bug tracker.

 NodeCraft


