Difference between revisions of "Visual guide to allocating RAM"
(Much better. Suggestions still welcome. Let's pass this around on Discord!) |
(Update intro to remove the mention of 1GB being an universal default, as it's a lot less common now.) |
||
| (27 intermediate revisions by 4 users not shown) | |||
| Line 1: | Line 1: | ||
| − | + | {{#seo: | |
| + | |title=Visual guide to allocating RAM | ||
| + | |title_mode=replace | ||
| + | |keywords=Pixelmon, Reforged, RAM, memory, Java, allocate, allocating, allocation, 1GB, lag, mod, mods, Technic, Minecraft, ATLauncher, AT, Launcher | ||
| + | |description=A visual guide to giving the game more memory on different launchers. | ||
| + | }} | ||
| + | <languages/> | ||
| + | <translate> | ||
| + | <!--T:1--> | ||
| + | On some setups, Minecraft may start up with only 1 GB of memory to work with. While [[Pixelmon]] may run with this low allocation, allocating more often helps performance and stability. This is especially true when also running other mods. This quick guide will guide you through the process. | ||
| − | == Minecraft launcher == | + | <!--T:2--> |
| − | {|class="mw-collapsible wikitable" | + | '''Stuck on 1 GB?''' A 64 bit install of Java is required to be able to allocate more than 1 GB of memory. You can get a 64 bit Java download for your operating system by [https://java.com/en/download/manual.jsp clicking this link]. If you run Windows, make sure you get <code>Windows Offline 64 bit</code> specifically! Restart your launcher after updating. |
| + | |||
| + | === AT Launcher === <!--T:3--> | ||
| + | {|class="mw-collapsible mw-collapsed wikitable" | ||
| + | |- | ||
| + | ! Step | ||
| + | ! class="unsortable" | Example | ||
| + | |- | ||
| + | |style="text-align:center"|Start the AT Launcher. | ||
| + | | [[File:attutorial1.png|none|800px]] | ||
| + | |- | ||
| + | |style="text-align:center"|Click on "Settings". | ||
| + | | [[File:attutorial2.png|none|800px]] | ||
| + | |- | ||
| + | |style="text-align:center"|Click into the "Java/Minecraft" tab. | ||
| + | | [[File:attutorial3.png|none|800px]] | ||
| + | |- | ||
| + | |style="text-align:center"|Click the "Maximum Memory/Ram" box and pick a higher setting. ''Check the note at the top of this page if you're unable to allocate more than 1GB.'' | ||
| + | | [[File:attutorial4.png|none|800px]] | ||
| + | |} | ||
| + | |||
| + | === Technic launcher === <!--T:4--> | ||
| + | {|class="mw-collapsible mw-collapsed wikitable" | ||
|- | |- | ||
! Step | ! Step | ||
! class="unsortable" | Example | ! class="unsortable" | Example | ||
|- | |- | ||
| − | |style="text-align:center"|Start the | + | |style="text-align:center"|Start the [[Technic launcher]]. |
| − | | [[File: | + | | [[File:techniclauncher.png|none|800px]] |
| + | |- | ||
| + | |style="text-align:center"|Click on "Launcher Options". | ||
| + | | [[File:technictutorial1.png|none|800px]] | ||
| + | |- | ||
| + | |style="text-align:center"|Click into the "JAVA SETTINGS" tab. | ||
| + | | [[File:technictutorial2.png|none|800px]] | ||
| + | |- | ||
| + | |style="text-align:center"|Click the "Memory" box and pick a higher setting. ''Check the note at the top of this page if you're unable to allocate more than 1GB.'' | ||
| + | | [[File:technictutorial3.png|none|800px]] | ||
| + | |} | ||
| + | |||
| + | === Minecraft launcher === <!--T:5--> | ||
| + | {|class="mw-collapsible mw-collapsed wikitable" | ||
| + | |- | ||
| + | ! Step | ||
| + | ! class="unsortable" | Example | ||
|- | |- | ||
| − | |style="text-align:center"| | + | |style="text-align:center"|Start the Minecraft launcher. |
| − | | [[File: | + | | [[File:newlauncher.PNG|none|800px]] |
|- | |- | ||
| − | |style="text-align:center"|Click on " | + | |style="text-align:center"|Click on "Installations". |
| − | | [[File: | + | | [[File:newtutorial1.PNG|none|800px]] |
|- | |- | ||
|style="text-align:center"|Click on your Pixelmon Forge profile. | |style="text-align:center"|Click on your Pixelmon Forge profile. | ||
| − | | [[File: | + | | [[File:newtutorial2.PNG|none|800px]] |
|- | |- | ||
| − | |style="text-align:center"|Click | + | |style="text-align:center"|Click More options. |
| − | | [[File: | + | | [[File:newtutorial3.PNG|none|800px]] |
|- | |- | ||
| − | |style="text-align:center"|Replace "-Xmx1G" with a higher amount | + | |style="text-align:center"|Replace "-Xmx1G" with a higher amount, |
| − | + | such as "-Xmx3G" (or "-Xmx3000M"). | |
| − | | [[File: | + | | [[File:newtutorial4.PNG|none|800px]] |
|- | |- | ||
| − | |style="text-align:center"|Click "SAVE" to save your settings | + | |style="text-align:center"|Click "SAVE" to save your settings |
| − | | [[File: | + | | [[File:newtutorial5.PNG|none|800px]] |
|} | |} | ||
| − | + | <!--T:6--> | |
| + | If you get stuck on any of these steps, or are having trouble finding the right amount to allocate or getting the game to run smoothly, check out the [[Fixing memory issues]] page or ask for help in the official [[Pixelmon Discord]]. | ||
| + | </translate> | ||
Latest revision as of 14:55, 14 June 2021
On some setups, Minecraft may start up with only 1 GB of memory to work with. While Pixelmon may run with this low allocation, allocating more often helps performance and stability. This is especially true when also running other mods. This quick guide will guide you through the process.
Stuck on 1 GB? A 64 bit install of Java is required to be able to allocate more than 1 GB of memory. You can get a 64 bit Java download for your operating system by clicking this link. If you run Windows, make sure you get Windows Offline 64 bit specifically! Restart your launcher after updating.
AT Launcher
| Step | Example |
|---|---|
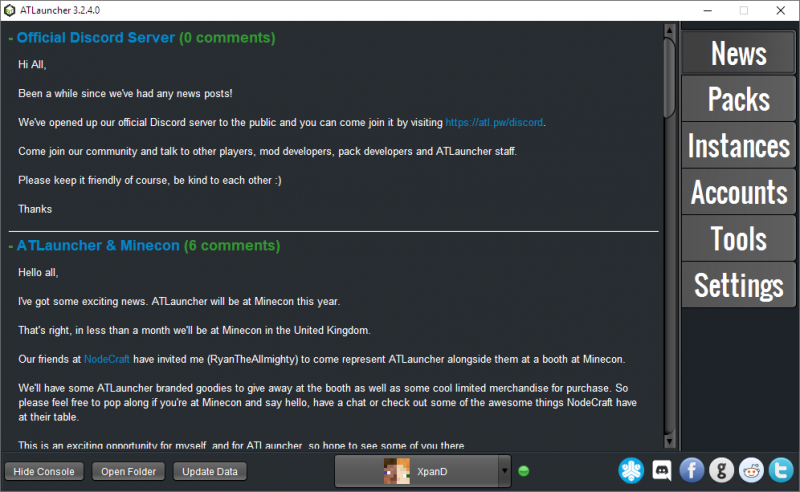
| Start the AT Launcher. | |
| Click on "Settings". | |
| Click into the "Java/Minecraft" tab. | |
| Click the "Maximum Memory/Ram" box and pick a higher setting. Check the note at the top of this page if you're unable to allocate more than 1GB. |
Technic launcher
| Step | Example |
|---|---|
| Start the Technic launcher. | |
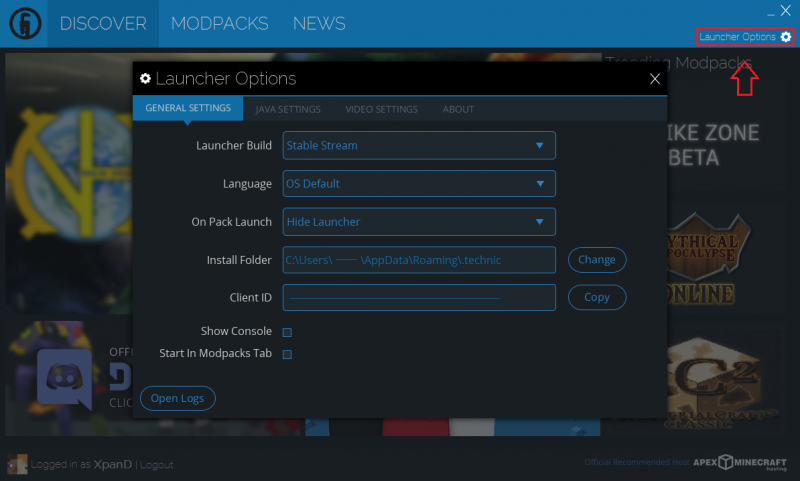
| Click on "Launcher Options". | |
| Click into the "JAVA SETTINGS" tab. | |
| Click the "Memory" box and pick a higher setting. Check the note at the top of this page if you're unable to allocate more than 1GB. |
Minecraft launcher
| Step | Example |
|---|---|
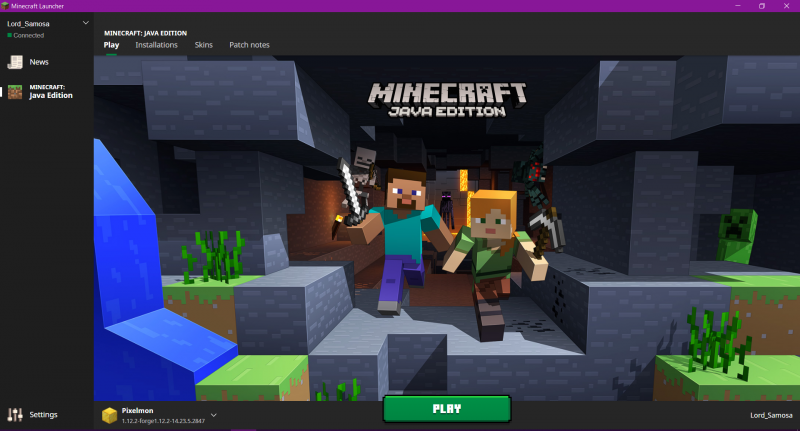
| Start the Minecraft launcher. | |
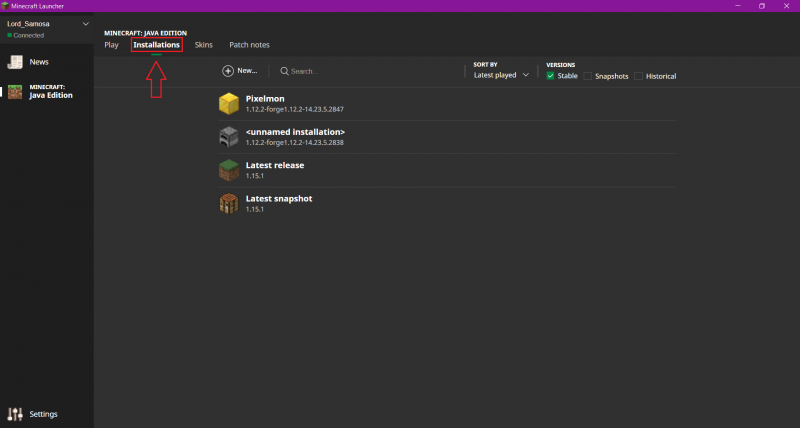
| Click on "Installations". | |
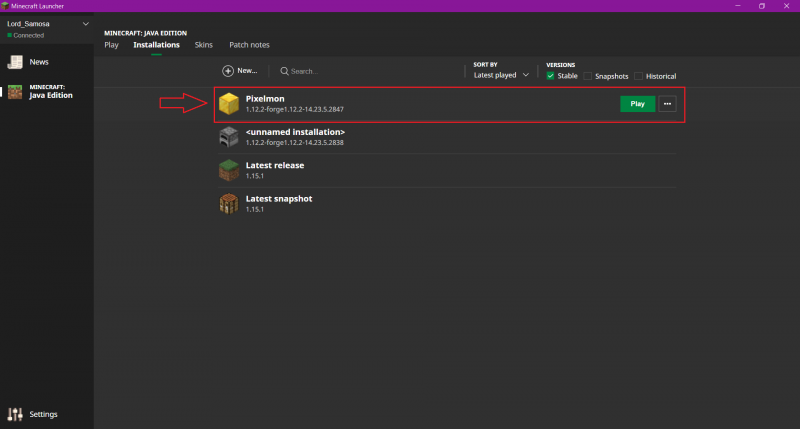
| Click on your Pixelmon Forge profile. | |
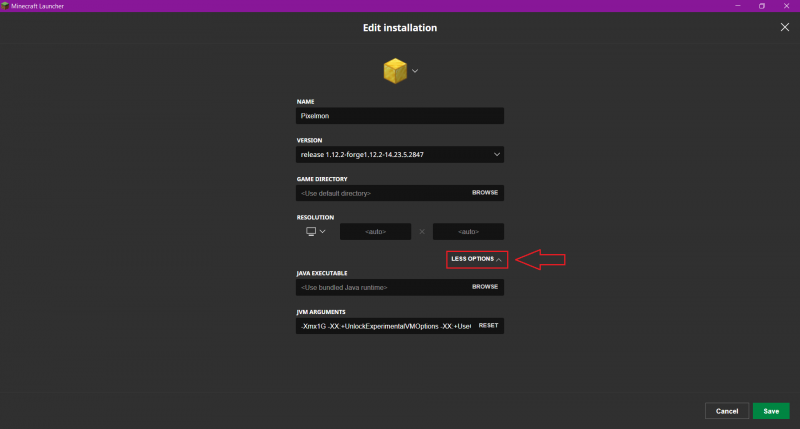
| Click More options. | |
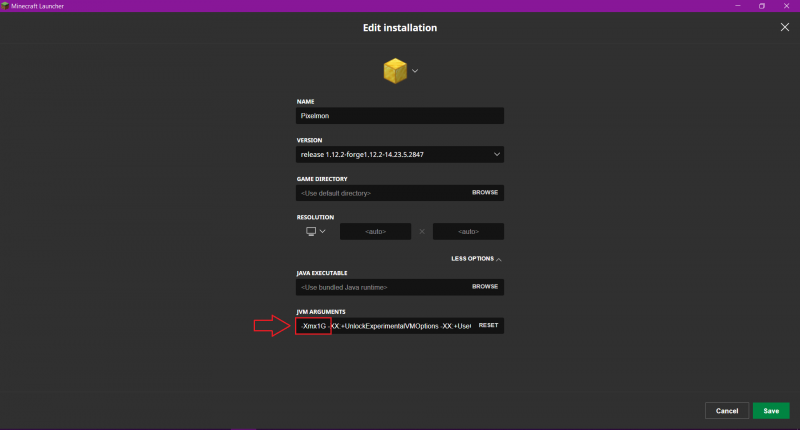
| Replace "-Xmx1G" with a higher amount,
such as "-Xmx3G" (or "-Xmx3000M"). |
|
| Click "SAVE" to save your settings |
If you get stuck on any of these steps, or are having trouble finding the right amount to allocate or getting the game to run smoothly, check out the Fixing memory issues page or ask for help in the official Pixelmon Discord.

 NodeCraft
